OAuth2 Client PHP >= 5.4.9
Setting up the client example
In order to run this example on your localhost do the following
- run composer update to make sure you have
- twig template library
- bshaffer's oauth2 library
- make sure
public/examples/_014_oauth2_client/cachehas write permissions to create the compiled template files
Now that you are ready, lets look at the example
This API Server is made using the following php files/folders
- index.php (gateway)
- Client.php (api)
- restler.php (framework)
- JsonFormat.php (format)
This API Server exposes the following URIs
GET            ⇠ Auth\Client::index()
GET authorized ⇠ Auth\Client::authorized()
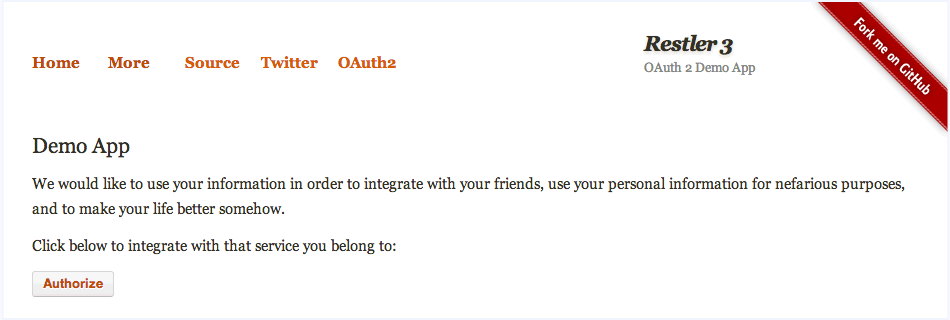
This example is part 1 in a 2 part example that shows how Restler can be integrated with the popular OAuth 2.0 Server library. This section -- the "client" -- is about asking for access rights and keeping a record of the important state mechanisms required to communicate with Restler once access has been granted.
If you're not familiar with OAuth, it's worth familiarizing yourself with the basics and in particular understanding the various workflow that OAuth 2.0 offers. The following two links may help:
- Official OAuth Specification: a bit dry but if you want the "facts" they're there.
- OAuth2 Simplified: a nicely summarized overview of how to think through the key aspects of OAuth 2.0
The role of the client application in OAuth is two-fold:
- Asking for access (aka, Authorization)
- Making authenticated requests (aka, Authentication)
It's important to understand that the workflow of asking for access varies by "grant type" in OAuth. The standard grant-types that OAuth 2.0 Server supports out-of-the-box are:
- Implicit: typically for browser based or mobile apps
- Authorization Code: typically for apps running on a server
- Password Credentials: typically used for apps that are owned by the same organisation as the OAuth service provider (aka, the Twitter client, etc.)
- Client Credentials: used by client's who want to update meta information about their site (URL's, logo's, etc.)
- JWT Auth Grant: the client submits a JSON Web Token in a request to the token endpoint. An access token (without a refresh token) is then returned directly.
- Refresh Token: client can submit refresh token and receive a new access token
Workflow
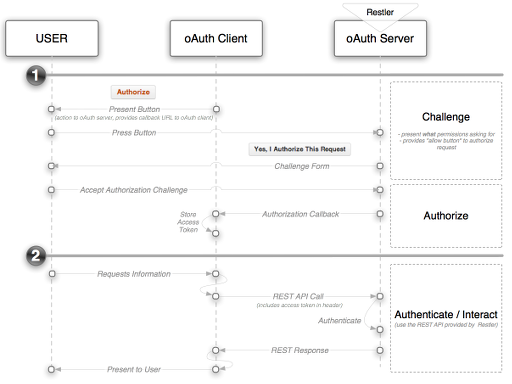
In this example the OAuth server is setup to manage the authorization code grant. Holistically
there really two parts to the process. First, the client must get authorization from the server and then
it will use that authorization (in the form of an "access token") to authenticate with the REST API from
that point forward. The two flows are illustrated below:
Authorization
The client apps role in authentication is two-fold. First it must direct the user to the server to start the process. And second, when the authorization has completed the client application's callback function will be executed and it will be responsible for saving the authorization information.
Authentication
Once the proper authorization has been attained by the client app, it's sole responsibility is to pass along it's authorization status in each RESTful API request. This is achieved by the client application adding a query parameter of 'code' set to the access token that the OAuth Server provided to the application in the authorization step.
Note:- there is an optional parameter on the server that allows the Access Token to be passed as a header variable instead of a query parameter.
In Conclusion
The "client application" plays an important role in the OAuth interaction and while your Restler server's primarily role will likely be to play the server role in this process it is useful to know that both client and server are available as part of the OAuth 2.0 Server module and both are easily made available to Restler.
For more information on how to start using this functionality with Restler be sure to look at the OAuth Server example.
We expect the following behaviour from this example.
@example14 @oauth
Feature: Testing OAuth Client

  Scenario: Getting Html response
    When I request "examples/_014_oauth2_client/index.html"
    Then the response status code should be 200
    And the response is HTML
It can be tested by running the following command on terminal/command line
from the project root (where the vendor folder resides). Make sure base_url
in behat.yml is updated according to your web server.
vendor/bin/behat features/examples/_014_oauth2_client.feature

